

How To Set Up A Medion Wireless Wifi Extender
Related Manuals for Medion E85029 Dr. 87119
Summary of Contents for Medion E85029 Doc 87119
- Page 1 Wireless WIFI Extender ® MEDION E85029 (Medico 87119) Instruction manual...
-
Page 2: Tabular array Of Contents
Contents Notes on how to employ these instructions ..five i.1. Symbols and central words used in these instructions ............5 Proper apply ............seven Safety instructions ..........8 3.1. Operating safety ..........8 3.2. Data backup ..........xi 3.three. Power supply ..........12 3.four. Declaration of conformity ...... - Page 3 7.iv. Quick setup ........... 53 vii.5. WPS settings ..........55 seven.6. Advanced settings ........56 Medion Finder Tool ........59 Troubleshooting .......... 61 Practice you need more than help? ......62 Cleaning ............63 Disposal ............64 Glossary ............67 Licence information ........73 GNU General Public Licence ......
-
Page 4: Notes On How To Use These Instructions
one. Notes on how to utilise these instructions Read the safety instructions carefully earlier apply. Note the warnings on the device and in the operating instructions. Always go along the operating instructions close to hand. The operating instructions are role of this product. If you sell the device or give information technology abroad, brand sure you also hand over these instructions and the warranty card. - Page 5 BEWARE! Please follow the instructions to forbid injuries and property damage! Attention! Please follow the guidelines to avoid property damage! Annotation! Boosted information on using the device. Notation! Please follow the guidelines in the operating instructions! WARNING! Alert: danger of electric stupor! •...
-
Page six: Proper Use
2. Proper apply This is an information electronics device. This device is designed to dilate the point in a Wi-Fi network. The amplification of the signal also increases the range of the Wi-Fi network. In addition, the device can be used as an access point for devices that communicate wirelessly or as a client for continued devices which do non accept their own Wi-Fi adapter. -
Folio 7: Safe Instructions
iii. Safety instructions Please read the instructions advisedly before first employ. The instructions will assistance you lot to op- erate the device reliably and assist increase its service life. Always keep these operating instructions nearly at manus to the device, simply store them safely so that y'all can pass them on to a new owner should you sell the device. - Page 8 • Keep the plastic packaging out of the accomplish of children as it can cause suffocation! • Always follow the user instructions of the devices that you connect to the Wi-Fi repeater. • Practice non place liquid-filled containers, such as vases, on or near the device. The container may tip over and the liquid may impair the electrical safety of the device.
- Page nine • The minimum distance between the user and/or whatsoever bystander and the radiating structure of the transmitter is xx cm. • After transporting the device, wait until it has reached room temperature before switching information technology on. Major fluctuations in temperature or humidity can lead to condensation which could cause an electrical short-circuit.
-
Page 10: Information Backup
be reset to the manufacturing plant settings. • Do not place any open flames (candles or similar) on or near the device. • Do not insert anything into the device through the slots and openings. This could result in an electric shock to the user, an electrical brusk-circuit or even ignite a fire which will damage your device. -
Page 11: Power Supply
damages that are incurred. Always fill-in your data onto an external storage device (e.g. CD-R) before updating it. 3.3. Ability supply • To disconnect the power supply to the device or to isolate the product entirely from voltage sources, disconnect the device from the mains completely by unplugging it from the mains socket. -
Folio 12: Proclamation Of Conformity
3.4. Declaration of conformity Medion AG hereby declares that product Doctor 87119 conforms to the post-obit European directives and standards: • R&TTE Directive 1999/5/EC • EMC Directive 2004/108/EC • Depression Voltage Directive 2006/95/EC • Ecodesign Directive 2009/125/EC • RoHS Directive 2022/65/EU. -
Page thirteen: Bank check Package Contents
Before utilize 3.5. Cheque package contents Please check your purchase to ensure that all items are included. If annihilation is missing, please contact usa inside fourteen days of purchase. Subsequently unpacking, ensure that the following parts have been supplied: • Wi-Fi repeater •... -
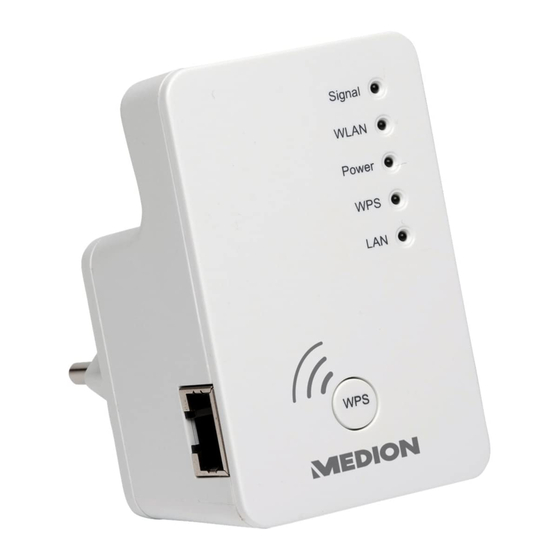
Folio 14: Overview Of The Device
4. Overview of the device Indicate WLAN Ability Access Point Range Extender/Verstärker Customer LAN port (RJ45) Wi-Fi signal force LED Wi-Fi LED Power LED WPS LED LAN LED WPS button/reset button Manner selector (access point; range extender/ amplifier; client) fifteen / 81... -
Page fifteen: Overview Of The Led Displays
4.i. Overview of the LED displays Colour Status Description Adept reception Permanently (signal strength 100–50%) Normal reception: Flashes slowly (50– Wi-Fi 25%) bespeak Orange Flashes forcefulness Poor reception: Flashes quickly (< 25%) No reception or LED Off mode has been selected Connection to a wireless router or Flashes... - Page 16 Colour Status Clarification The repeater is activated. In LED Off mode all LEDs are deactivated apart from the Power LED Permanently Via the web interface, the LED Off fashion can too be set so the POWER Green Power LED is also deactivated.
- Folio 17 Colour Condition Description In one case a WPS connexion has Permanently been successfully made, the WPS LED lights upwardly for 5 minutes. A WPS connection is beingness established or the device is waiting for the WPS point Flashes from another slowly Light-green device.
- Page 18 Color Condition Description A connection via Permanently the LAN port has been established The connection via the LAN port Flashes Green is active (data are being transmitted) No LAN connection or the LED Off manner has been selected nineteen / 81...
-
Page 19: Start Of Operation
5. Start of operation five.i. Setting the operating mode Use the mode switch on the Wi-Fi repeater to switch the device to the operating mode that you wish to utilise. The usage possibilities are described in the following chapter. 6. Operating mode six.1. - Folio xx 6.one.one. How to gear up the Wi-Fi repeater for operation every bit a repeater: Set up the mode selection switch to RANGE EXTENDER/ Acess Point AMPLIFIER. Range Extender / Verstärker Customer Connect the repeater just to an hands attainable mains socket. The POWER LED lights up.
-
Page 21: Wps Push
6.1.ii. Installation equally repeater via the WPS button The quickest, easiest and most secure way of establishing a wireless connection between the repeater and the Wi-Fi router is by using the WPS button. Notation! This connection method presupposes that both devices accept a WPS push button. To do this, refer to the transmission of your router. -
Folio 22: The Spider web Interface
In one case the connection has been established, the WPS LED lights upward for five minutes. If the WPS LED flashes quickly, there has been an error during connection. Await two minutes until the LED goes out and restart the connectedness procedure. - Page 23 Wi-Fi repeater. The Wi-Fi repeater now receives the IP addresses from the router and passes them on to the devices connected to the Wi-Fi repeater. Installation Connect the LAN port on your reckoner with the LAN socket on the repeater using the supplied LAN cable.
- Page 24 Then open your web browser and enter either "http://repeater.setup" or the IP address "192.168.66.254". The repeater's login window appears. Enter the default user name "admin" and the default password "1234". Click on "OK". (epitome similar) The Quick Setup menu appears. All bachelor wireless access points are listed.
- Folio 25 Annotation! If the desired admission point is not listed, ensure that information technology is active and move the repeater closer to the access point. Then click on "UPDATE" to update the list of available wireless access points. If the desired access point is not listed (because it is a hidden network) place a bank check in the box "Fix repeater manually"...
- Page 26 (epitome similar) Note! The "Device SSID" is the network phone call sign of the repeater and, as default, is prepare to the aforementioned SSID as the access indicate to which the repeater is connected. However, you can enter a different SSID hither if desired. ...
- Folio 27 6.1.4. Later the configuration You lot can remove the LAN cable from the Wi-Fi repeater. Note! You can also connect a LAN cable to the LAN port on the Wi-Fi repeater to connect with the network of the admission point whose signal is beingness amplified by the Wi-Fi repeater.
-
Page 28: Installation Equally Client
6.ii. Installation equally client Use the customer mode to use the Wi-Fi repeater equally a Wi- Fi adapter. This allows you to register devices that just take a LAN port (e.g. fix-top boxes, printers ...) to the network via Wi-Fi. Note! The "Device SSID"... - Page 29 6.2.1. Wi-Fi repeater basic settings in customer style • Earlier the Wi-Fi repeater is configured via the web interface, DHCP for Wi-Fi and LAN is activated. • After the Wi-Fi repeater has been fix via the Quick Setup carte and connected to the habitation router, the Wi-Fi repeater restarts.
- Page 30 Set the mode selection switch Acess Point to Customer. Range Extender / Verstärker Client Connect the repeater merely to an hands accessible mains socket. The Power LED lights upwardly. NOTE! Before yous offset making settings, the device should exist continued to the mains outlet for near i minute until the repeater/amplifier is fully booted.
- Folio 31 rapidly. At present press the WPS button on the router with which you would like to connect the repeater. This step must be carried out within two minutes. The connection is established and the network information is exchanged. Once the connectedness has been established, the WPS LED lights up for v minutes.
- Page 32 6.two.3. Installation every bit client via the web interface Set the mode pick switch to Customer. Acess Betoken Connect the repeater but Range Extender / Verstärker Client to an hands attainable mains socket. The Ability LED lights Connect the LAN port on your computer with the LAN socket on the repeater using the supplied LAN cable.
- Page 33 The repeater'due south login window appears. Enter the default user proper noun "admin" and the default countersign "1234". Click on "OK". (paradigm similar) The Quick Setup menu appears. All available wireless access points are listed. Select the admission point with which the repeater should be connected and click on "NEXT".
- Page 34 NOTE! If the desired access point is not listed, ensure that it is active and motion the repeater closer to the admission betoken. Then click on "UPDATE" to update the list of available wireless admission points. If the desired access betoken is non listed (because it is a hidden network) place a bank check in the box "Set repeater manually"...
- Page 35 (prototype like) Wait a few seconds while the repeater restarts. After the restart is complete, you lot tin can connect the estimator via the repeater to an access betoken from the list of available networks. Annotation! To call upwardly the Quick Setup carte once more at any time, press downwards the WPS button for about 10 seconds, until the Ability LED flashes.
-
Page 36: Installation As Ap (Access Point)
six.iii. Installation as AP (access point) Select AP fashion, if you want to operate the repeater every bit a wireless access signal. In this operating mode, the repeater acts as a wireless interface for communication with the network. For example, you tin connect the repeater to a network router that has no Wi-Fi interface then that devices tin can at present access the network router via the repeater. - Page 37 half dozen.three.1. Configuration equally AP Fix the mode selection switch to AP. Connect the repeater only to an Acess Bespeak hands accessible mains socket. Range Extender / Verstärker Client The POWER LED lights up. NOTE! Earlier you start making settings, the device should be connected to the mains outlet for well-nigh ane minute until the repeater/amplifier is fully booted.
- Folio 38 Skip the suggestion from Windows to set up the network using the Windows Setup and select the entry "VERBINDUNG MIT DEM NETZWERK HERSTELLEN, OHNE ES EINZURICHTEN". So open up your spider web browser and enter either "http://repeater.setup" or the IP accost "192.168.66.i".
- Page 39 (image similar) The "SECURITY" window appears. Select a network encryption type. The possible encryption options are: WEP, WPA pre-shared central or WPA RADIUS. (image like) If all of the connection data are right, click "Utilize". (image similar) Wait a few seconds while the repeater restarts. Afterward the restart has been completed, the repeater is bachelor every bit a wireless admission point.
- Page twoscore (paradigm similar) Now connect the LAN port on the Wi-Fi repeater with the LAN port on the home router or a network socket for your habitation network using the supplied LAN cablevision. Clients (other computers or Wi-Fi-capable devices) inside the range of the repeater can now be connected to the Wi-Fi repeater (by entering the previously defined network key or via the WPS...
- Page 41 6.3.2. Connecting to the repeater's admission point using the WPS button The quickest, easiest and virtually secure style of establishing a wireless connectedness between the repeater and the device that is to be connected to the access bespeak is by using the WPS push. ...
- Page 42 WPS LED lights upwardly for 5 minutes. If the WPS LED flashes, there has been an error during connection. Wait two minutes until the LED goes out and restart the connection process. After the connection has been completely set up, the signal LED will betoken the quality of the connectedness.
- Page 43 The repeater'due south login window appears. Enter the default user name "admin" and the default password "1234". Click on "OK". (image similar) The Quick Setup card appears. Enter an SSID (network identification) past which the repeater can be identified as an "Access Betoken" in the network.
- Folio 44 (prototype similar) If all of the connexion data are correct, click "Apply". (image like) Await a few seconds while the repeater restarts. Afterwards the restart has been completed, the repeater is available as a wireless access point. 45 / 81...
-
Page 45: The Web Interface
7. The web interface You tin can apply the web interface to configure the repeater and set it upwardly to adapt your needs or, if the connection via WPS was non successful, to make a connexion. The appearance of the web interface will change for each selected mode, as options volition be hidden or shown depending on whether they are required for the selected way. -
Page 46: Manually Setting Upward Dhcp On A Windows Pc
NOTE! If the repeater has already been configured, the transfer of the IP address of the PC via which you desire to access the repeater must exist set manually. See side by side section. 7.ii. Manually setting up DHCP on a Windows PC In AP operation, the management IP accost of the repeater is set to 192.168.66.1. - Page 47 (TCP/IP) – General and and then enter the IP address as described in the following: • IP accost: 192.168.66.ten (whereby ten can be a number between 2 and 200. If more than ane computer is using this admission point, each computer must use its own number) •...
- Page 48 • IP accost: 192.168.66.x (whereby ten tin be a number between 2 and 200. If more than one computer is using this admission signal, each computer must apply its ain number) • Subnet mask: 255.255.255.0 To finish, click on OK. 7.2.3.
- Page 49 (epitome similar) On the left margin, y'all will find iv menu options for configuring the repeater. The contents of the private menus differ depending on which way the repeater is set to. fifty / 81...
-
Page 50: Home Folio
seven.3. Home page On the dwelling house page yous will find all the information on the repeater and its settings. 7.three.1. System Operating time This shows the operating fourth dimension since the unit of measurement was concluding switched on. Device version This shows the version of the device. Firmware version This shows the version of the firmware. - Page 51 Aqueduct This shows the channel that the Wi-Fi repeater is transmitting on. Security This shows what encryption method the Wi-Fi repeater is set to use. If no encryption has been set, the entry displays "Deactivated". BSSID (MAC) This shows the MAC address of the repeater's Wi-Fi adapter.
-
Page 52: Quick Setup
7.3.3. LAN settings IP accost This shows the Wi-Fi repeater's IP address. Subnet mask This shows the subnet mask which the Wi-Fi repeater is set to. Standard gateway This shows the standard gateway which the Wi-Fi repeater is gear up to. MAC address This shows the MAC address of the repeater'south LAN adapter. -
Page 53: Access Point Mode
point is shown automatically. Click the Utilize button to terminate the procedure. The information are saved and the repeater restarts. After the restart of the repeater is completed, the abode page of the spider web interface volition reappear. You can at present close the browser. -
Folio 54: Wps Settings
7.5. WPS settings In the WPS settings bill of fare, yous can configure the repeater'due south WPS function. WPS functionality is activated by default. To deactivate this function, remove the tick from the box WPS EINSCHALTEN. seven.v.1. Wi-Fi protected setup information Y'all will detect a listing of WPS settings under the heading Wi-Fi Protected Setup Data. -
Page 55: Advanced Settings
7.5.2. Device configuration Nether the heading Device Configuration, y'all have the pick to configure the WPS settings: • Configuration mode: Here you can fix the Wi- Fi repeater as either enrollee or registrar for WPS permissions on the network. • Configuration via push push method: Here yous tin run the WPS function via the software. - Page 56 Carte du jour option Meaning The fragment threshold setting is used for the transmission of Fragment threshold fragmented information packets. The default value is 2346. This setting is used to define RTS threshold the RTS value. The default value is 2347. This setting defines the interval Beacon interval for sending out the beacon.
-
Page 57: Mac Filter
Card option Significant This setting defines the type of CTS protect CTS signal. This setting defines a value for TX power regulating the transmitting power of radio systems. You can switch off the LEDs on the device. To practise this, put a tick in the check box LED out mode. -
Folio 58: Medion Finder Tool
Wi-Fi. On the supplied CD you will find a Finder Tool that will make access to the web interface easier. Double-click on the file Medion-Finder.exe to start the Finder Tool. NOTE! The repeater can simply be plant by the Finder Tool during the initial installation. - Folio 59 (image like) Insert the CD-ROM in the correct drive on your computer. Double-click on the file Medion-Finder. exe to first the Finder Tool. (image similar) If you do not want to employ the Finder, open your web browser and enter either "http://repeater.
-
Page sixty: Troubleshooting
Annotation! If the repeater is continued via a LAN cable, the Wi-Fi connexion to the repeater even so has to be established. The Finder Tool will assist you lot to admission the repeater'due south configuration menu. ix. Troubleshooting Error • No LED is lit •... -
Page 61: Practise Y'all Need More Aid
10. Do you need more help? If the above suggestions did not solve your problem, please contact u.s.a.. The following information would assistance united states: • What external devices are connected? • When operating the product, at which step did the problem occur? •... -
Folio 62: Cleaning
eleven. Cleaning Follow the instructions beneath to increase the service life of the product: • Always unplug the mains adapter and disconnect all the cables before cleaning the product. • Do not use solvents, corrosive agents or aerosol- based detergents to clean the device. •... -
Folio 63: Disposal
12. Disposal Packaging Your appliance has been packaged to protect information technology confronting transportation harm. Packaging materials are raw materials and can therefore be reused or recycled. Device Erstwhile appliances should non be disposed of with the household waste product. As per Directive 2022/19/EU, the device must exist properly disposed of at the end of its service life. - Page 64 Technical data Input: Air-conditioning 100 - 230 V ~ 50/threescore Hz Wi-Fi standard: 802.11 b/g/n Frequency 2.4 GHz Dimensions come across diagram 42 mm 69 mm Signal WLAN Power Access Point Range Extender/Verstärker Client 38 mm Consumption (LAN performance) 1.43 W (Wi-Fi operation) 1.95 Westward Standby 1.3 W...
- Page 65 Humidity during performance: 5%–65% Subject to technical and optical changes besides as printing errors. 0700 66 / 81...
-
Folio 66: Glossary
thirteen. Glossary Admission Point (AP), Wireless AP Besides known as a base of operations station, this is an electronic device that functions as an interface for wireless communications devices. End devices make a radio connectedness to the wireless admission betoken via a wireless adapter. - Page 67 DHCP – Dynamic Host Configuration Protocol A protocol to assign an IP address to devices in the network. Dynamic addresses allow a device to have a dissimilar IP address each time it connects to a network. In some systems, the IP accost changes automatically while the device is connected.
- Folio 68 The SSID is set up at the base of operations station. To connect several base stations to the same network, they need to be set to the same SSID; this is so known every bit an ESSID (extended SSID). Gateway The standard gateway is provided by the computer/ router in the network in which all queries are made which accept no address in the local network (queries in the Cyberspace).
-
Folio 69: Subnet Mask
Passphrase Key The network key that is used for authentication on a WEP/ WPA2 encrypted network. Registrar The device that publishes and withdraws WPS permissions inside a network. A registrar tin exist integrated into a wireless access point or be separate from the admission point (AP). - Page seventy TCP/IP Transmission Command Protocol/Internet protocol – a serial of protocols used for communication via connected networks. The standard for data transmission via networks. Run into too Protocol. Wi-Fi Protected Setup (WPS) is a standard used to simply add together devices to an existing network without the often laborious setting up of an adequate encryption.
- Page 71 Push button Configuration (PBC): The access bespeak and the devices to be continued to information technology all have a physical or virtual (software-based) button to prepare a connexion. When this is pressed, a ii-infinitesimal phase starts in which the devices can join the network. 72 / 81...
-
Page 72: Licence Information
Anyone interested can download the source text of the relevant GPL/LGPL by following this link: http://www.medion. com. Please state the MD number or MSN number in the download centre. These numbers can be found on the product. -
Folio 73: Gnu Full general Public Licence
fifteen. GNU General Public Licence Version 2, June 1991 Copyright (C) 1989, 1991 Free Software Foundation, Inc. 51 Franklin Street, Fifth Flooring, Boston, MA 02110-1301, USA Anybody is permitted to copy and distribute verbatim copies of this license document, but changing it is not immune. Preamble The licenses for nearly software are designed to take away your freedom to share and change it. - Folio 74 source code. And you lot must show them these terms so they know their rights. We protect your rights with two steps: (1) copyright the software, and (2) offer you this license which gives you legal permission to copy, distribute and/or change the software. Also, for each author's protection and ours, nosotros want to make certain that everyone understands that there is no warranty for this complimentary software.
- Page 75 Program is covered just if its contents plant a work based on the Plan (independent of having been fabricated past running the Program). Whether that is true depends on what the Program does. 1. You may copy and distribute verbatim copies of the Program's source code every bit you receive it, in whatever medium, provided that y'all clearly and accordingly publish on each copy an appropriate copyright notice and disclaimer of warranty;...
- Folio 76 identifiable sections of that work are non derived from the Plan, and can exist reasonably considered contained and split works in themselves, so this License, and its terms, do not apply to those sections when y'all distribute them every bit separate works. Only when you distribute the aforementioned sections as part of a whole which is a work based on the Plan, the distribution of the whole must be on the terms of this License, whose permissions for other licensees extend...
- Page 77 program in object code or executable form with such an offering, in accord with Subsection b in a higher place.) The source code for a work means the preferred grade of the work for making modifications to it. For an executable work, complete source code means all the source code for all modules it contains, plus any associated interface definition files, plus the scripts used to command compilation and installation of the executable.
- Page 78 original licensor to re-create, distribute or modify the Program discipline to these terms and conditions. You may not impose whatever farther restrictions on the recipients' exercise of the rights granted herein. You are not responsible for enforcing compliance by third parties to this License.
- Page 79 8. If the distribution and/or use of the Program is restricted in certain countries either past patents or past copyrighted interfaces, the original copyright holder who places the Program nether this License may add an explicit geographical distribution limitation excluding those countries, so that distribution is permitted only in or among countries not thus excluded.
- Page fourscore A PARTICULAR PURPOSE. THE ENTIRE Chance As TO THE QUALITY AND Functioning OF THE Programme IS WITH YOU. SHOULD THE PROGRAM PROVE Defective, YOU ASSUME THE Price OF ALL NECESSARY SERVICING, REPAIR OR CORRECTION. 12. IN NO Consequence UNLESS REQUIRED BY APPLICABLE LAW OR AGREED TO IN WRITING WILL Whatever COPYRIGHT HOLDER, OR Any OTHER PARTY WHO MAY Modify AND/OR REDISTRIBUTE THE PROGRAM Equally PERMITTED Above, BE LIABLE TO Y'all FOR...
- Page 81 120 Faraday Park, Faraday Route, Dorcan Swindon SN3 5JF, Wiltshire United kingdom of great britain and northern ireland Hotline: 0333 32 13 106 (National charge per unit) Fax: 01793 71 57 16 To contact us by email please visit the "Service and Back up" section of our website at world wide web.medion.co.great britain. www.medion.co.great britain...

How To Set Up A Medion Wireless Wifi Extender,
Source: https://www.manualslib.com/manual/1024435/Medion-E85029-Md-87119.html
Posted by: dayjast1956.blogspot.com
0 Response to "How To Set Up A Medion Wireless Wifi Extender"
Post a Comment